

Mini Apple Delights: A Taste of Fall in Every Bite
As the leaves begin to change and the air turns crisp, the warmth of comforting desserts becomes even more inviting. Among the myriad of autumn treats, Mini Apple Delights stand out as a perfect embodiment of the season. These delightful little pastries encapsulate the flavors of fall, offering a sweet and spiced apple filling enveloped in a flaky crust. Whether you’re hosting a gathering, looking for a cozy night in dessert, or simply craving something sweet, these mini pastries are sure to impress.
One of the most appealing aspects of Mini Apple Delights is their simplicity. With a few basic ingredients and straightforward steps, anyone can whip up a batch, making them an ideal choice for bakers of all skill levels. Additionally, these treats provide a wonderful opportunity for customization. Feel free to experiment with different types of apples, spices, or even add-ins like nuts or dried fruit. The ability to tailor the recipe to suit personal tastes ensures that everyone can enjoy a version of Mini Apple Delights that speaks to them.
Understanding the Ingredients
To create the perfect Mini Apple Delights, selecting the right ingredients is crucial, starting with the apples. The type of apple you choose will significantly influence the taste and texture of the filling. Two popular choices are Granny Smith and Honeycrisp. Granny Smith apples are known for their tartness, which provides a nice contrast to the sweetness of the sugar and spices. Their firm texture holds up well during baking, ensuring that the filling remains intact and deliciously juicy.
On the other hand, Honeycrisp apples bring a natural sweetness and crispness that enhances the overall flavor profile. Their juiciness makes them an excellent option for those who prefer a sweeter dessert. Mixing the two varieties can also yield a delightful balance, combining tartness and sweetness for a more complex flavor experience. Ultimately, the choice of apples allows bakers to create Mini Apple Delights that cater to their personal preferences and elevate the dessert to new heights.
Equally important in crafting these pastries are the spices. Cinnamon and nutmeg are classic companions to apples, enhancing their natural flavor and adding warmth to the filling. A sprinkle of cinnamon lends a comforting sweetness, while nutmeg adds a hint of earthiness that complements the apples beautifully. Additionally, a splash of lemon juice brightens the mixture, balancing out the sweetness and adding a refreshing note that elevates the overall flavor profile.
The role of flour in the filling should not be overlooked. A small amount of flour acts as a thickening agent, binding the flavors together and preventing the filling from becoming too runny during baking. This ensures that each bite of the Mini Apple Delights is filled with a perfectly cohesive mixture of apples and spices, creating a delightful taste experience.
When it comes to the crust, you have options. Using refrigerated pie crusts offers convenience and saves time, making it a great choice for those who want to whip up a quick batch of Mini Apple Delights. These store-bought options are typically made with quality ingredients and can yield excellent results with minimal effort. However, for those who prefer a more hands-on approach, making homemade pie crust can elevate the flavor and texture of the pastries. A homemade crust allows for control over the ingredients and the resulting flakiness, making it a rewarding endeavor for dedicated bakers.
Step-by-Step Preparation of Mini Apple Delights
Before diving into the preparation of these delicious pastries, it’s essential to preheat the oven. Preheating is a crucial step in baking, as it ensures even cooking and helps achieve that perfect golden-brown crust. Aim to set your oven to 375°F (190°C) to create the ideal baking environment for your Mini Apple Delights.
Next, let’s focus on preparing the apple filling. Begin by peeling, coring, and slicing your chosen apples into thin, even pieces. This is important for achieving uniform cooking and ensuring that every bite is deliciously tender. In a large mixing bowl, combine the sliced apples with sugar, cinnamon, nutmeg, and lemon juice. Stir gently to coat the apples evenly with the mixture. This is where achieving the perfect balance of sweetness and spice comes into play. Taste the mixture and adjust the sugar or spices according to your preference. For those who enjoy a richer flavor, consider adding a dash of vanilla extract or a sprinkle of brown sugar for added depth.
Once your apple filling is ready, it’s time to roll out the pie crust. If you are using refrigerated pie crusts, simply unroll them on a lightly floured surface. If you’re making your own crust, ensure that it is chilled before rolling it out. To avoid tearing, use a rolling pin and apply even pressure, rolling from the center outwards. A light dusting of flour on your work surface and the dough will help prevent sticking. Aim for a thickness of about 1/8 inch, which will provide a sturdy yet tender envelope for your delicious filling.
With the crust rolled out, the next step will be to cut it into appropriate sizes for your mini pastries. This is where creativity can shine! You can use a round cutter to create circles for traditional mini apple pies or opt for squares for a more rustic look. The key is to ensure that each piece is large enough to hold a generous spoonful of your apple filling while maintaining a manageable size for individual servings.
Stay tuned for the next part, where we’ll delve into assembling these delightful pastries and the baking process that transforms your prepared ingredients into a golden, flaky treat that embodies the comforting flavors of fall.
Filling and Sealing the Pies
Creating the perfect Mini Apple Delights starts with mastering the filling and sealing process. Both are crucial to ensuring that these delightful pastries not only taste great but also hold up well during baking.
Suggestions for Cutting Perfect Circles
To achieve perfectly uniform circles for your pastry dough, consider using a round cookie cutter or the rim of a glass. Aim for a diameter of about 3-4 inches. Here’s how to cut perfect circles:
1. Chill the Dough: Make sure your dough is chilled before cutting. This helps keep the dough firm and makes it easier to cut clean circles.
2. Flour the Surface: Lightly flour your work surface to prevent sticking.
3. Press Down Firmly: When using your cutter, press down firmly and twist slightly to ensure a clean cut.
4. Avoid Excess Scraps: To maximize your dough, cut as many circles as possible with minimal scraps. Gather any leftover dough, re-roll it, and cut additional circles.
Best Practices for Portioning the Filling
Portioning is essential to prevent overfilling, which can lead to messy pies. A general guideline is to use about 1 tablespoon of filling per circle of dough. Here’s how to ensure proper portioning:
1. Use a Measuring Spoon: Measure out your apple filling using a tablespoon to maintain consistency across all pies.
2. Avoid Overstuffing: If the filling overflows, it can leak during baking. Leave a small border around the edge of the dough circle to allow for expansion.
3. Distribute Evenly: If making multiple pies, distribute your filling evenly to ensure each pie has the same delicious flavor.
Techniques for Sealing the Pies
Sealing the pies effectively is key to preventing any leakage during the baking process. Here’s how to seal your Mini Apple Delights properly:
1. Brush the Edges: Before placing the top piece of dough, brush a little water around the edges of the bottom dough circle. This helps the two pieces adhere better.
2. Press and Crimp: Place the top dough circle over the filling and press down gently. Use a fork to crimp the edges, creating a decorative pattern while ensuring a tight seal.
3. Pinch the Edges: For extra security, you can pinch the edges of the dough together with your fingers to create a more robust seal.
Preparing for Baking
Now that your Mini Apple Delights are filled and sealed, it’s time to prepare them for baking.
Egg Wash and Its Purpose
An egg wash is a mixture of beaten egg and water or milk that is brushed on the pastry before baking. This step is essential for achieving a beautiful golden-brown finish. Here’s how to make it:
1. Prepare the Mixture: In a small bowl, whisk together one egg with a tablespoon of water or milk. This will create a glossy finish on your pastries.
2. Brush Generously: Using a pastry brush, gently apply the egg wash over the tops of your sealed pies. Be careful not to let it drip down the sides, as this can cause the bottom to stick.
Importance of Sprinkling Sugar
Sprinkling a little sugar on top of the egg wash before baking adds texture and sweetness. Here’s how to do it:
1. Use Granulated Sugar: After applying the egg wash, lightly sprinkle granulated sugar over the top of each pie.
2. Consider Cinnamon Sugar: For an extra layer of flavor, mix a bit of cinnamon into the sugar before sprinkling it on.
Baking the Mini Apple Delights
The baking process is where your Mini Apple Delights will transform into golden, flaky pastries.
Ideal Temperature and Time
Preheat your oven to 400°F (200°C). This temperature is perfect for achieving a flaky crust while ensuring the filling is cooked through. Bake your Mini Apple Delights for about 15–20 minutes.
What to Look For
During baking, keep an eye on the color and texture:
1. Golden-Brown Color: Look for a rich golden-brown color on the tops of the pastries, indicating that they are perfectly baked.
2. Puffed Pastry: The edges should be puffed and slightly crispy, showcasing the flaky texture of the pastry.
Cooling Process
After baking, allow your Mini Apple Delights to cool on a wire rack. This is crucial for maintaining their crispiness, as cooling on a flat surface can cause them to become soggy.
1. Transfer Carefully: Use a spatula to transfer the pies to the wire rack.
2. Cool Completely: Allow them to cool for at least 10-15 minutes before serving. This cooling time helps the filling set, making them easier to handle.
Serving Suggestions
Presenting your Mini Apple Delights can be as fun as baking them. Here are some creative ideas for serving:
Plating and Garnishing
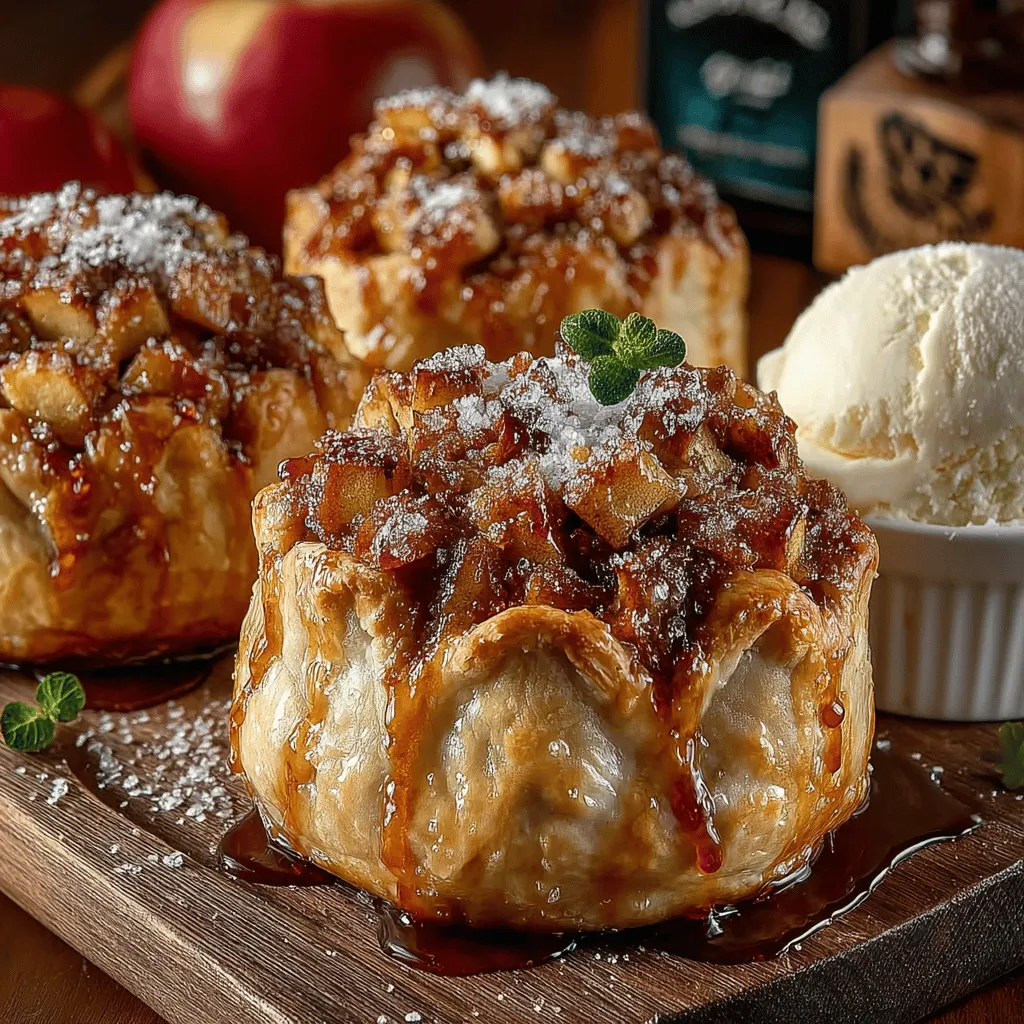
1. Simple Presentation: Arrange the Mini Apple Delights on a decorative plate, perhaps dusted with powdered sugar for an elegant touch.
2. Garnish with Fresh Apples: Add thin slices of fresh apple or a sprinkle of cinnamon around the plate for a pop of color.
Accompaniments
Pair your Mini Apple Delights with delicious accompaniments:
1. Vanilla Ice Cream: A scoop of vanilla ice cream complements the warm apple filling perfectly.
2. Whipped Cream: Lightly sweetened whipped cream offers a creamy contrast to the crispy pastry.
Enjoying at Different Temperatures
These Mini Apple Delights can be enjoyed warm or at room temperature. They are perfect for any occasion, whether served as a delightful dessert after dinner or as a sweet treat during a gathering.
Nutritional Information
While indulging in delicious desserts, it’s also important to consider nutritional content. Here’s a brief overview of what you can expect from your Mini Apple Delights:
– Calories: Each Mini Apple Delight contains approximately 150-200 calories, depending on the size and filling.
– Carbohydrates: They are primarily made up of carbohydrates from the pastry and apples, providing energy.
– Vitamins: Apples are a great source of dietary fiber and vitamin C. Incorporating this treat into a balanced diet can be enjoyable and nutritious.
Conclusion
Making and sharing Mini Apple Delights is not just about baking; it’s about creating memories that last a lifetime. These delightful pastries are perfect for family gatherings, festive occasions, or simply as a special treat to enjoy at home.
Encourage creativity by experimenting with different fillings, such as pears or berries, or by adding spices like nutmeg or cloves for a unique twist. No matter how you choose to customize this recipe, the joy of making Mini Apple Delights will always bring smiles to the table. So roll up your sleeves, gather your ingredients, and indulge in the delightful process of baking these sweet treats!